Disclaimer
This blogpost has been first published on my old blog on July 26, 2021. Since it seemed to have been met with some interest, i decided to repost this on my new blog. Please note that I haven’t validated whether every detail is still absolutely spot-on.
Using Canvas Apps as a Outlook Add-In
More and more Power Platform components are getting seamlessly integrated into other Microsoft Applications, such as Teams and Outlook. With Microsoft Teams calling and meetings being integrated this Autumn, one of the few things we cannot do as of now, is including Canvas Apps in Outlook. With the powerful UI Design Capabilities of Canvas Apps, one might be inclined to use a Canvas App as an Outlook Add-In. This is actually surprisingly easy and doable with minimal Coding knowledge. Here you will find a Step-by-Step instruction on how to getting started in creating your very own Outlook Add-In based on power Apps Canvas Apps.

Getting started
In order to getting started with your very own Outlook Add-In, you want to create a new Project in Visual Studio. If you haven’t already started working with Visual Studio, you can get started for free by downloading and registering for the Visual Studio Community under https://visualstudio.microsoft.com
While downloading, make sure you check the “Office Developer Tools for Visual Studio” Package for download. If you already have Visual Studio installed, you might need to install the package retrospectively.

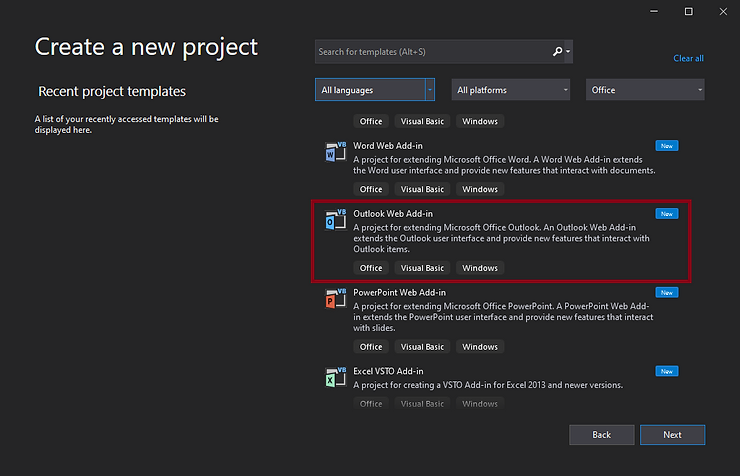
Now Create a new Project of Type “Outlook Web Add-in”, don’t worry about the name, it will work in Desktop, Web and Mobile.
Calling your App via Iframe and Adding Parameters
After your project will be setup, you will see a couple of files in your solution. To start, open the “MessageRead.html” File. Here you can control the UI Appearance of your Add-In, using HTML (Don’t worry, we’re not going to do anything fancy for now).
Prepare your Canvas App that you want to use as Add-In and Publish your changes. If you now open your App you should end up on a URL that looks something like this:
https://apps.powerapps.com/play/{YOUR APP ID}?{YOUR PARAMETERS}
To make use of this, replace everything within the HTML body with the following code:
<body>
    <div>
        <iframe width="300" height="800" frameborder="0" id="myApp"
         src="https://apps.powerapps.com/play/{YOUR APP ID}?source=iframe"
        />
    </div>
</body>
Add your custom App ID in the src Tag of the Iframe. We don’t need any parameters for now, so it will just display the App, without any data shown in it.
Test your Outlook Add-In

You should now be ready to Test your Add-In. To do so, start by executing your Project by pressing the “Start” Button at the Top of your Visual Studio.
You will now be asked to connect to an Exchange email account Login with your user credentials for Outlook (Just enter your email and password and press “Connect”). Make sure to also check the option “Remember my account settings” so you don’t have to login anytime you want to tryout your Add-In.
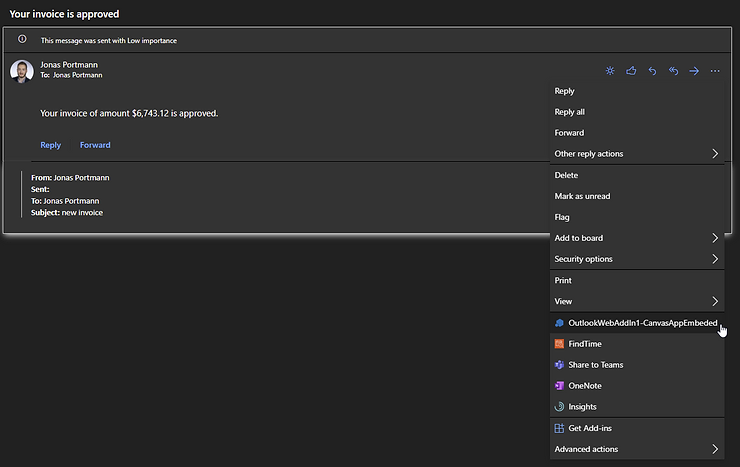
Login to Outlook and open any message. You should now be able to run your Custom Outlook Add-In, which should show you your Power App

Add Parameters to your App
Office.initialize = function(reason) {
    $(document).ready(function() {
        var element = document.querySelector('.MessageBanner');
        messageBanner = new components.MessageBanner(element);
        messageBanner.hideBanner();
        loadProps();
    });
};
Replace it with the following:
Office.initialize = function (reason) {
    $(document).ready(function () {
        var outlookItem = Office.context.mailbox.item;
        var parameters =
            "&subject=" + outlookItem.subject +
            "&from=" + outlookItem.from.emailAddress +
            "&fromname=" + outlookItem.from.displayName +
            "&recievedOn" + outlookItem.dateTimeCreated;
        document.getElementById('myApp').src += parameters;
    });
};
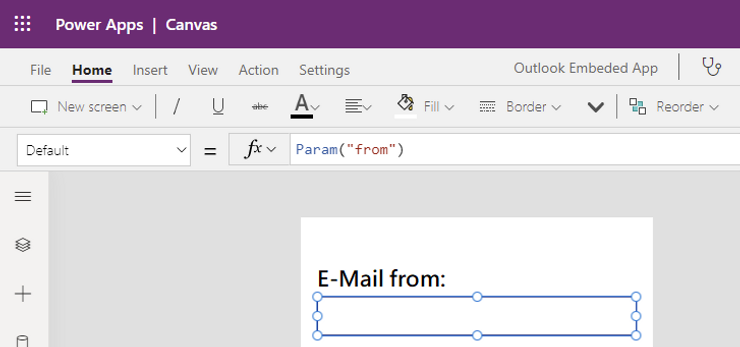
This will add the Mail Subject, Sender Name, Sender E-Mail and Date of Receival as Variables to your canvas App. If you now want to use that data anywhere within your App, you can do so by calling the matching Variable via the Param() Function:

What do I need as a potential User?
First and foremost, ensure you have an M365 License to unlock the full potential of Microsoft’s ecosystem. Additionally, make sure you have access to the environment where everything was originally created. Don’t forget to share the necessary app with users and grant them the appropriate Security Roles, but remember to keep their privileges minimal for Power Apps and provide them with the essential writing permissions in Dataverse.
3 Comments
נערות ליווי · 15. November 2023 at 2:32
I was pretty pleased to uncover this website. I wanted to thank you for ones time for this wonderful read!! I definitely savored every part of it and I have you saved as a favorite to see new information on your site.
Soundari · 6. December 2023 at 13:08
Hi Jony,
I have tried this, after hitting start button it renders outlook in browser, but Custom Outlook Add-In is not coming in Outlook messages, kindly help me fix this.
Jony · 4. January 2024 at 15:06
Hi Soundary
Thanks for reaching out, sadly I was not paying attention to this site towards the end of the year. Please feel free to reach out to me via email: jony(at)jonys-corner.com. There you can also send some details or screenshots that might help understand what issue you are facing.